3. Setting Up and Configuring the User Profile Service
The User Profile
Service is an independent service application that can be started and
configured from SharePoint Central Administration. The management user
interface provides a central location to monitor and maintain the User
Profile Service application.
Make sure you
have met the following prerequisites prior to starting the User Profile
Service application from SharePoint Central Administration.
There is an instance of the Managed Metadata Service. There is a managed path for My Sites such as /users. There is an application pool for My Sites. There is a My Sites host.
3.1. Starting the User Profile Service
To start the User Profile Service, complete the following steps.
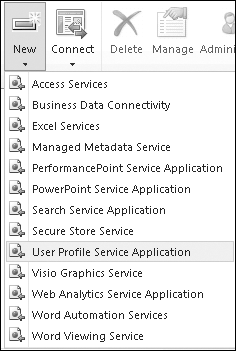
Open a browser and go to the SharePoint Central Administration website. Under Application Management, click Manage Service Applications. Click the Service Applications tab at the top of the Application Management section to activate the Ribbon. Click New in the Create group of the Ribbon and then click User Profile Service Application in the drop-down list, as shown in Figure 2.
In the Create New User Profile Service Application dialog box shown in Figure 3, type a unique name in the Name text box. This is the name you want to assign to the User Profile Service application.
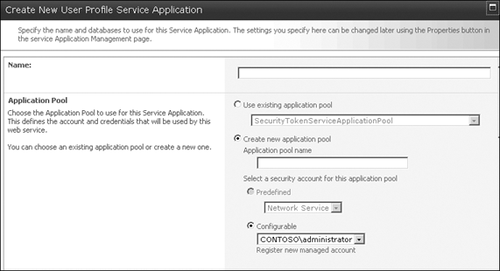
To
assign an application pool to this application, either select Use
Existing Application Pool or create a new application pool by following
these steps. Select the Create A New Application Pool option. Type the name for the new application pool. Under
Select A Security Account For This Application Pool, select Predefined
to choose an existing predefined security account from the list, or
select Configurable to choose an existing managed account. If you want
to use a managed account that is not on the list, click the Register A
New Managed Account link to register a new managed account.
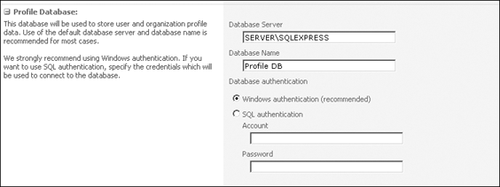
The
Profile Service application stores all the required information in
three different databases. In the Profile Database section, enter the
following information, as shown in Figure 4. In the Database Server text box, type the name of the database server where the profile database will be located. In the Database Name text box, type the name of the database where the profile information will be stored. In
the Database Authentication section, select Windows Authentication to
use Integrated Windows Authentication to connect to the profile
database, or select SQL Authentication to enter the network credentials
that will be used to connect to the profile database. In
the Failover Server section, in the Failover Database Server text box,
type the name of the database server to be used in conjunction with
Microsoft SQL Server database mirroring.
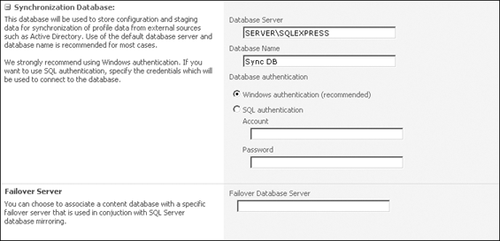
In the Synchronization Database section, enter the following information, as shown in Figure 5. In the Database Server text box, type the name of the database server where the synchronization database will be located. In
the Database Name text box, type the name of the database where the
synchronization information for synchronizing user profiles with
external databases will be stored. In
the Database Authentication section, select Windows Authentication to
use Integrated Windows Authentication to connect to the synchronization
database, or select SQL Authentication to enter the network credentials
that will be used to connect to the synchronization database. In
the Failover Server section, in the Failover Database Server text box,
type the name of the database server to be used in conjunction with
Microsoft SQL Server database mirroring.
In the Social Tagging Database section, enter the following information, as shown in Figure 6. In the Database Server text box, type the name of the database server where the social tagging database will be located. In
the Database Name text box, type the name of the database where the
social tagging information like tags and notes will be stored. In
the Database Authentication section, select Windows Authentication to
use Integrated Windows Authentication to connect to the social tagging
database, or select SQL Authentication to enter the network credentials
that will be used to connect to the social tagging database. In
the Failover Server section, in the Failover Database Server text box,
type the name of the database server to be used in conjunction with
Microsoft SQL Server database mirroring.

In
the case of a multiserver environment, you can choose the application
server on which you want to host the profile service. The Profile
Synchronization Instance section lists all the servers added to the
farm, and you can choose any server on which you want to run the Profile
Synchronization Service. The next couple
of sections require information about the My Site application that will
be associated with this User Profile Service application, as shown in Figure 7. In the My Site Host URL section, type the URL of the site collection where the My Site host has been provisioned.
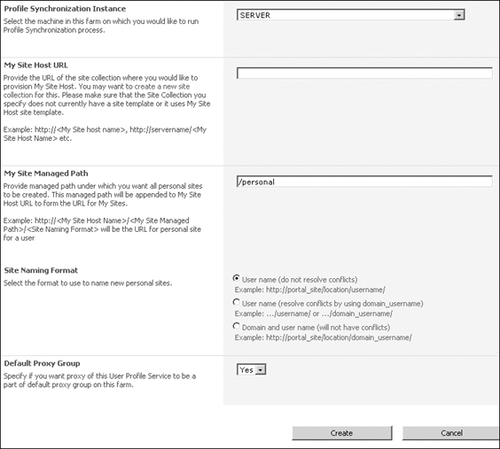
In the My Site Managed Path section, type the managed path where the individual My Site websites will be created. Choose
the naming format for naming new My Sites when they are created by
selecting one of the following formats in the Site Naming Format
section. User name (do not resolve conflicts) User name (resolve conflicts by using domain_username) Domain and user name (will not have conflicts)
In the Default Proxy Group
section, indicate whether you want the proxy of this User Profile
Service to be a part of the default proxy group on this farm. Select Yes
if you want to include the proxy and No otherwise. Click Create to provision the new User Profile Service application.
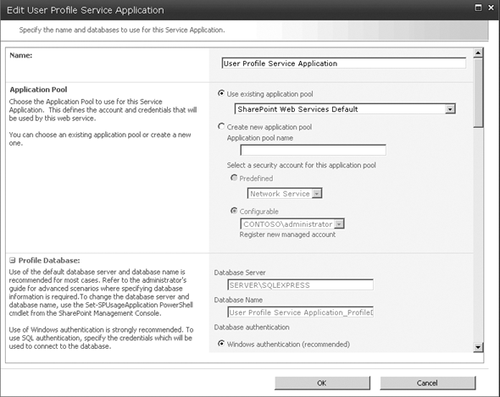
3.2. Editing an Existing User Profile Service Application
To modify properties of an existing user profile application, perform the following steps.
Open a browser and go to the SharePoint Central Administration website. Under Application Management, click Manage Service Applications. Select
the User Profile Service Application that you want to edit. When you
make a selection, the row has a blue background of color and the Service
Application tab Ribbon control on top of the page is enabled. Click the Properties button under the Operations group. The Edit User Profile Application dialog box opens. All edits that are required can be made in this dialog box, as shown in Figure 8.
3.3. Delegating Administration of a User Profile Service Application
SharePoint 2010 allows farm
administrators to delegate the administration activities of a service
application to a service application administrator. A service
application administrator can perform all administrative tasks related
to the service application but cannot perform activities related to
other service applications or change settings in Central Administration.
To delegate the administration role of the User Profile Service application, perform the following steps.
Open a browser and go to the SharePoint Central Administration website. Under Application Management, click Manage Service Applications. Select
the User Profile Service Application you want to edit. When selected,
the row has a blue background and the Service Application tab Ribbon
control on top of the page is enabled. Click the Administrators button under the Operations group. In the Administrators For User Profile Service dialog box, type the user name in the people picker control, as shown in Figure 9, and then click Add.
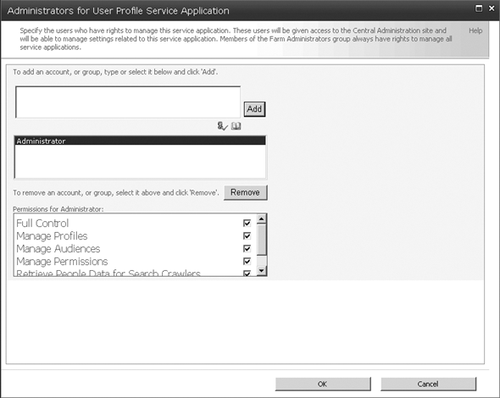
In
the Permissions For Administrator section, select Full Control and
click OK. This adds the specific user as the Administrator for the User
Profile Service Application. To remove a user from the Administrator role, select the user from the list and click Remove.
3.4. Creating User Sub-types
SharePoint 2010 introduces a
new feature known as the user sub-type. A sub-type is a different type
of user in SharePoint. For example, user types can be employees,
contractors, interns, and so on. SharePoint 2010 allows these different
types of users to coexist, and sub-types help to categorize users. Each
of these user types can have a distinct set of profile properties. Use
the following steps to create or remove a user sub-type.
Open a browser and go to the SharePoint Central Administration website. Under Application Management, click Manage Service Applications. Select the User Profile Service Application you want to edit. Click the Manage button under the Operations group to open the Manage Profile Service page shown in Figure 10.
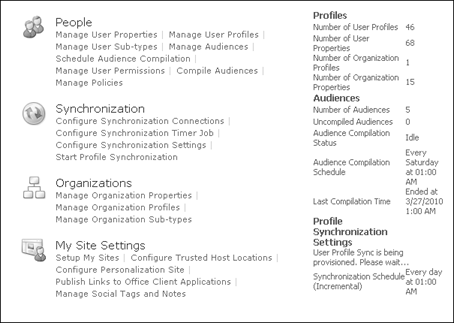
On the Manage Profile Service page, click Manage User Sub-types under the People section, which will take you to the settings page shown in Figure 11.
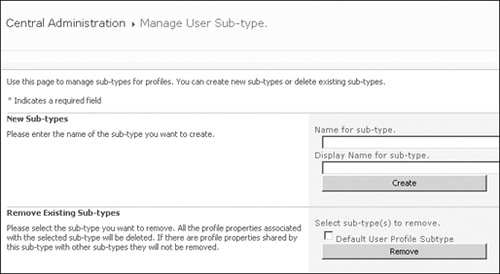
In the New Sub-types section, fill in the following information. In the Display Name text box, type the name for the sub-type that you want to display to end users. In the Name text box, type the internal name for the user sub-type.
Click Create and the new sub-type will be created. To remove an existing sub-type, select the check box for the sub-type and click Remove.
3.5. Creating User Profile Properties
The user profile properties are
basic building blocks for the profile service application. The
properties are the attributes that help describe a user profile.
Although the user profile properties concept was present in SharePoint
Server 2007, there are certain changes in the current version that you
will look at as you create a new profile property.
Open a browser and go to the SharePoint Central Administration website. Under Application Management, click Manage Service Applications. Select the User Profile Service Application you want to edit. Click the Manage button under the Operations group. On the Manage Profile Service page, click Manage User Properties under the People section. On the Manage User Properties page, click New Property. On the Add User Profile Property page shown in Figure 12, enter the following information in the Property Settings section.
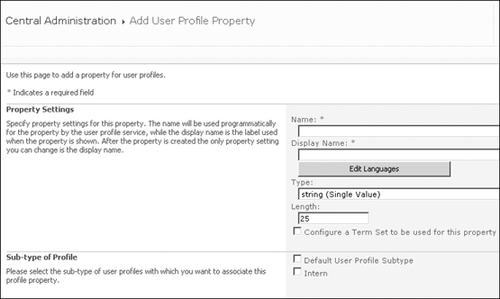
In the Name text box, type the internal name for the profile property. In the Display Name text box, type the name for the profile property that you want to display to end users.
Note:
One of the new features of
SharePoint 2010 is built-in support for localization. The user can now
add display values in different languages for each display field by
clicking the Edit Language button.
Choose the data type for this property from the Type drop-down list.
Note:
Based on the type
selected, additional fields might show up in this section. For example,
for the data type string (Single Value), you can specify the maximum
length of the property in the Length column, and you can also associate
the property with a term set by selecting the check box for Configure A
Term Set For This Property and then choosing the value from the
drop-down list.
You
can associate the property with any of the user sub-types by selecting
the check box of the sub-type in the Sub-type Of Profile section. Specify the description of the property in the Description text box in the User Description section, as shown in Figure 13. The description can be information about the property that will help users identify the property.

You can specify the policies settings for the property in the Policy Settings section, as shown in Figure 12. Choose from the drop-down list whether the property is Optional, Required, or Disabled. For the Default Privacy setting, you can choose the users who can see this profile property. Select the User Can Override check box if you want the user to modify these settings. Select the Replicate check box if you want this property to display in the user info list for all sites.
In the Edit Settings section, you can choose whether the user can edit this property or not. In
the Display Settings section, you can choose how the user can view the
property in the My Site Profile Property page or in the Edit Property
page. You can also enable Track Updates To The Property to log changes
in the user change log. In
the Search Settings section, you can specify whether the property is
indexed or not. Indexing a property can make the property value return
in search results. You can also enable a property to be aliased, which
will make the property a suitable alias for the user in search. In the Add New Mapping section, shown in Figure 14, you can map a user
profile property to an attribute from an external data source. After a
property has been mapped to an external attribute, the profile property
will get a value from the attribute during synchronization. You can
choose a Source Data Connection from the drop-down list, which contains
all of the added external directory connections.
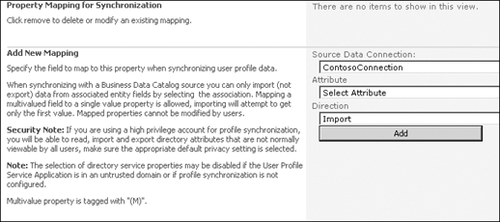
Depending
on the connection you select, the attributes field will be populated
from that directory source. A new feature of SharePoint 2010 is that it
enables profile properties to write back values to external directory
sources (only for Active Directory and LDAP). You can choose whether the
profile property value will be exported to the external data source or
imported from the external data source by selecting the appropriate
value from the Direction drop-down list. When you are finished, click OK to create the new profile property.
3.6. Editing and Deleting Existing User Profile Properties
To edit or delete an existing User Profile Property, complete the following steps.
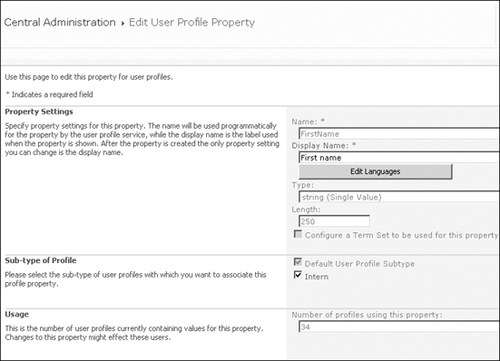
Open a browser and go to the SharePoint Central Administration website. Under Application Management, click Manage Service Applications. Select the User Profile Service Application you want to edit. Click the Manage button under the Operations group. On the Manage Profile Service page, click Manage User Properties under the People section. On
the Manage User Property page, select the property you want to edit and
select Edit from the drop-down list. On the Edit User Profile Property
page, shown in Figure 15, make the required edits and click OK.
To
delete a profile property, select the property you want to delete on
the Manage User Property page. From the drop-down list for the property,
select Delete. Confirm the deletion on the dialog box and click OK.
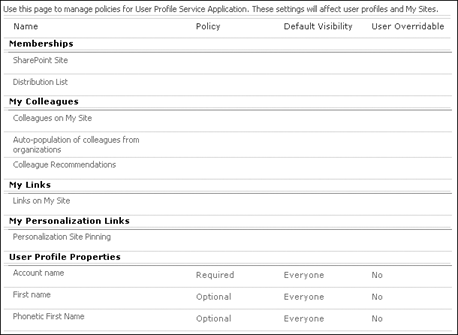
3.7. Editing Profile Policies
SharePoint 2010 provides a
centralized location for viewing and editing all policies for profile
services. Through this centralized location, a user can see all the
policies defined for the profile services in User Profile Properties, Colleagues, Memberships, and so on.
To edit a policy through this centralized location, complete the following steps.
Open a browser and go to the SharePoint Central Administration website. Under Application Management, click Manage Service Applications. Select the User Profile Service Application you want to edit. Click the Manage button under the Operations group. On the Manage Profile Service Page, click Manage Policies under the People section, which will bring you to a settings page, shown in Figure 16.
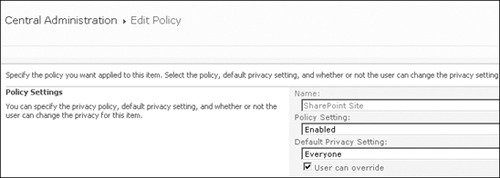
On
the Manage Policies page, select the policy you want to edit. From the
drop-down list for the property, select Edit, which opens the Edit
Policy settings page, shown in Figure 17. On the Edit Policy page, make the required edits and click OK.
3.8. Creating and Configuring Audiences
Audiences
were a feature of SharePoint Server 2007 that has been carried forward
in SharePoint 2010 with few changes. The following steps provide a quick
overview of how to create and configure a new audience in SharePoint
2010.
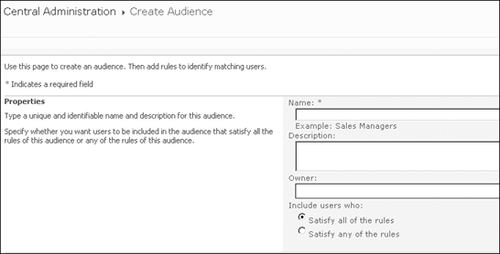
Open a browser and go to the SharePoint Central Administration website. Under Application Management, click Manage Service Applications. Select the User Profile Service Application you want to edit. Click the Manage button under the Operations group. On the Manage Profile Service Page, click Manage Audiences under the People section. On the View Audience page, click the New Audience link. On the Create Audience page, under the Properties section shown in Figure 18, specify the following information to create a new audience. Description Give a brief description about the audience. Owner Specify the owner of the audience. Include Users Who
Each audience builds its members based on certain rules. Specify
whether the users who become the members of this audience must satisfy
all the rules defined or some of the rules defined.
Click
OK to create the audience. When the audience has been created, the user
is redirected to the Add Audience Rule page to add rules for the new
audience. You can add a rule based either on the user or on some profile
property. In
the Operand section on the Add Audience Rule page, choose whether the
rule is based on a user or a profile property, as shown in Figure 19. If you choose to base the rule on a profile property, select the profile property you want to use from the drop-down list.
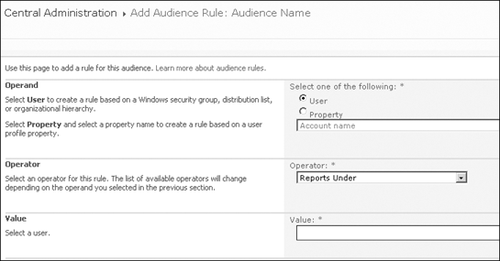
In the Operator section, select a valid operator from the list of available operators for the operand. In the Value section, type the value in the text box and then click OK to add the rule to the audience. When a rule has been created, the user is redirected to the View Audience Properties page, shown in Figure 20,
which lets the user add new rules to the audience, view audience
memberships, edit audience properties, or compile an audience.
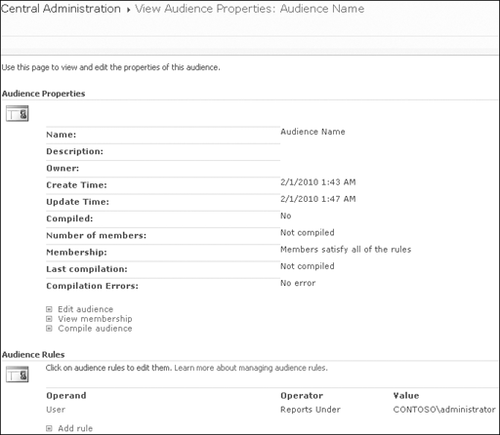
Audience compilation is
a process through which users are added as members of the audience
based on the rules specified. After an audience is created, you must
compile the audience at least once for it to add users as members of the
audience. A scheduled job for audience compilation is generally
preferred to add or update members of the audience.
|